We just got our iMac with the 3 TB Fusion drive in it to do some testing to get Windows installed on a Boot Camp partition. I had a 1 TB Fusion drive and suspected that I could get it working, but wanted to wait until it arrived before posting. There are 2 major issues with getting Boot Camp running on a 3 TB Fusion Drive:
1. Since the EFI uses the MBR partition table to flag the bootable partition (and other things), the Windows partition must be completely within the first 2.2 TB of the drive.
2. The Fusion drive uses Core Storage to combine the speed goodness of SSD with the capacity of a standard hard drive. Windows has no knowledge of Core Storage, and is not able to boot from a Core Storage volume.
Additionally, Disk Utility limits the number of partitions you can create. If there is a Core Storage volume, Disk Utility will only allow you to create one additional partition. The additional partition is not a core storage volume, but rather a standard partition that can be used to boot windows.
The introduction of the 3 TB Fusion drive adds the final wrinkle. Since Disk Utility only allows you to create one additional partition, and you have to put the Windows partition AFTER the Mac partition, you cannot make the Windows partition completely within the first 2.2 TB.
To get around this, you can use Disk Utility to create one additional partition, then use the command line “diskutil” command to split this new partition. It is possible to completely break down the Core Storage volumes and rebuild them, but that requires you to pave and restore the data, which is unacceptable to me. Using the technique outlined in this article, you can create a Boot Camp partition without any loss of data or migration requirements.
Here is the goodness step by step:
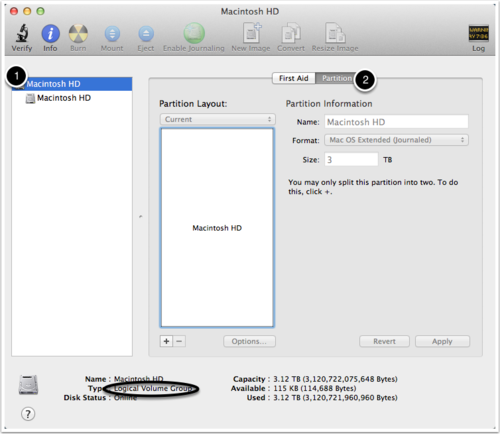
Open Disk Utility in the Utilities folder, and then:
1. Select the top level Macintosh HD
2. Select the partition tab.
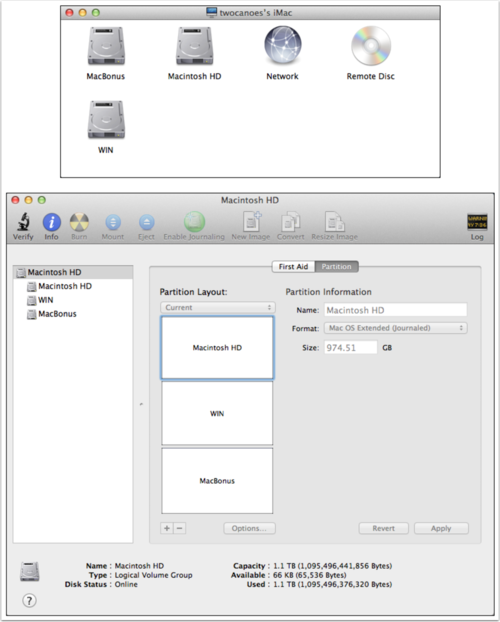
Create the Extra Partition
In order to end up with three 1 TB partitions, you need to split the 3 TB partition into a 1 TB Mac (HFS+) partition and a 2 TB partition. We will then split the 2 TB partition again into two 1 TB partitions. This is required because Disk Utility only allows you to create one additional partition. The terminal command “diskutil” can then be used to split the 2 TB partition into two 1 TB partitions.
To split the 3 TB Core Storage partition into a 1 TB Core Storage partition and a 2 TB non-core storage partition:
- click the “+” button
- drag the slider between the two partitions so that the top partition is a bit less than 1 TB and the bottom partition is about 2 TB.
- Make sure that the name of the second partition is “Extra” since that name will be used in the next step.
- Click Apply
This will not erase the Macintosh HD, but will just resize it to make room for the new partition.
Split the Second Partition
CAREFUL: When splitting a partition, the partition that is going to be split will be erased. Do not run these commands unless you have a good backup and are sure that the partition you are splitting does not have any data you need to keep.
Since Disk Utility cannot create more than one additional partition when one of the partitions is managed by Core Storage, you must use the diskutil command. To do this, open Terminal in the Utilities folder. The “diskutil” command has an option called “splitPartition” that will create two partitions from one partition. This will erase data on the partition you are splitting, but since we just created this new partition in the prior step, it should not contain any data.
Let’s take a look at the various parts of the command.
sudo diskutil splitPartition /Volumes/Extra 2 MS-DOS WIN 1T JHFS+ MacBonus 0b
1. sudo diskutil splitPartition: diskutil is the utility to modify disks, and the splitPartition verb tells it what we are doing. The “sudo” portion runs the command with administrator privileges.
2. /Volumes/Extra: The partition that is going to be split
3. 2: The number of partitions to split the original partition into.
4. MS-DOS: the format of the first partition. This will be the bootcamp partition
5. WIN: The name of the boot camp partition that will be the first part of the old partition.
6. 1T: The size of the new bootcamp partition. It will be 1 Terabyte.
7. JHFS+: The format of the second partition created from the split.
8. MacBonus: The name of the second partition created from the split.
9. 0b: The size of the second partition created from the split. Since the last partition of a split always fills up the remaining space, we can specify 0 bytes and let diskutil figure out the exact size.
Type the following command in terminal, and press return:
sudo diskutil splitPartition /Volumes/Extra 2 MS-DOS WIN 1T JHFS+ MacBonus 0b
If you are prompted for your administrator credentials, enter them when prompted.
Results after Splitting
You should now have 3 partitions, each about 1 TB each. The first partition, Macintosh HD, still is controlled by Core Storage and will have all the advantages of a Fusion drive. The second partition, WIN, will allow you to install Windows or restore a Winclone image on to it. The final partition, MacBonus, has the remaining space. The Windows volume must be within the first 2.2 TB of hard drive space.
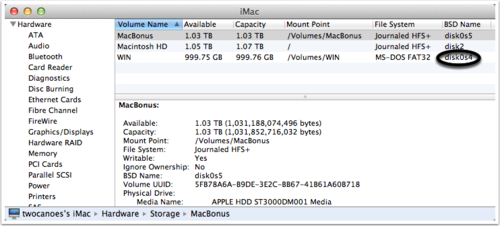
Verification
After restart, open System Information in the Utilities folder and verify that the Windows partition is disk0s4.
Restart to Proceed to Install or Restore
After repartitioning the disk, you should restart since it will assign the expected partition numbers after restart.
Installing Windows
If you are installing Windows, you can insert now install Windows 7 or Windows 8 on the new Windows partition. Since the 3 TB iMac does not have an internal optical drive, you either need to purchase the external optical drive, or create a bootable USB stick from a different Mac that allows you to run Boot Camp assistant. You can also restore a Winclone image.